Ask Not the Sparrow How the Eagle… er… Sews.

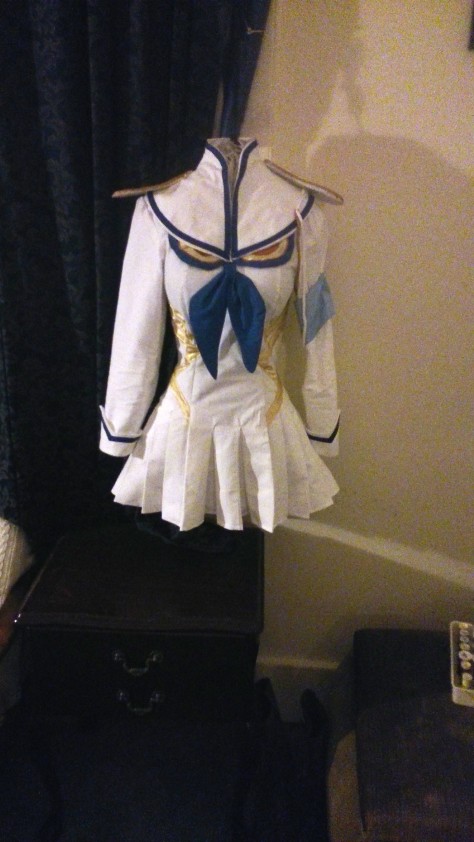
The Junketsu is nearly done!

DSC_1135Even though, come to notice it, his ties (moustaches?) are a bit big.

DSC_1136

Hells yeah for the stripe matching!

I’ll upload some closer shots of the different bits in a post or two to show how I did them, but at this stage the only real differences from my last post are:

1) The skirt and sleeves are on.  So are the cuffs. They’re a little shallow for total accuracy, but behold the proverbial barren field where I grow the craps I could give.  The skirt was an… interesting step, and I think the order I thought to do things in wasn’t optimal, but it still worked out in the end. It pretty much needs a post to itself.

2) Bias tape.  I bought the blue bias tape because I hate making bias tape with the kind of instinctive disgust that snails reserve for salt (except without the frothing and dying part).  That said, all the gold stripes are bias tape that I made from a fabric that bears an uncanny resemblance to the faux silk that my alma mater uses for Environments degree hoods.  I think it’s literally the same stuff.  (Hannah and Thom does this look like ‘manila folder’ colour to you? Cause it does to me.)  The advantage of using bias tape for the stripes though is that it can be fernangled around corners and curves with relative ease, thus negating the requirement for patterning of any kind.  I just stuck the dress on the dress form and pinned it all on.  Then I sewed it all on, which was harder because of the bulk of the garment and also because that stupidly slippy synthetic satin (are you feeling alliterated yet?) squiggled around a bit while I was trying to sew it.  It probably didn’t help that I was watching Attack on Titan OVAs at the same time, but I have no regrets.

3) The zip is in.  I was terrified that it was going to be too narrow across the back and I was going to bust the zip, but it’s stood up to an experimental trip to the kitchen for tea with my favourite housemate, so I remain hopeful.  The zip is a sturdy thing that I salvaged from a fugly dress from a theatre garage sale.  (Translation: I don’t care that it’s not a white invisible zipper because frugality for the win!)

4) The armband, which sucks and I want to redo.

5) The epaulettes are coming along.  They’re a bit big, so I might shave some off the back ends, but I think I’ll see about that once the fringe is on.  Which will happen when I actually get some fringe.  Which might happen when I get paid.  Maybe.  The gold cord is cheap white piping cord which I’m painting, because it was 60 cents a metre and I already had gold paint lying around, and actual gold cord was like, $5.00 a metre.  No brainer.

6) It has been hemmed.  It’s now short enough that it would not pass muster at any school with a dress code.

The stuff that’s left to do stands thusly: work out how to attach and fasten the floating collar, trim the epaulettes, work out how to attach them (I’m thinking the trad way because that’s how I roll), make the boots (eep!) and hairclips, buy a wig, and buy a katana.  Because it looks silly with an umbrella:

DSC_1132

Subjugation is liberation… from precipitation?

Back in the (Shirt/Cosplay) Game

I think I’m finally getting the hang of this whole sewing by machine thing (I know, it’s taken me long enough, right?). In all seriousness though, the past month and a bit has seen me get the hang of shirts.  Shirts!  That staple of my wardrobe that I never thought I’d master.  Now I see shirts in shop windows/on the internet/on actual people and, given I have the right fabric, buttons to hand and about 5 hours, I can make them mine for half or a third of the price.  It’s scarily addictive.

It’s also fun toying with the pattern I’m using (which is pretty frumpy), to see what different results I can get and what makes a shirt look fresh.

Stage one of the pattern-fernangling produced this:

DSC_1093Ignore the wrinkles.

Ie: a navy cotton voile shirt (leftovers from the Bombshells dresses) with contrast cuffs and under collar.  I followed the pattern pretty closely.  I just removed the waist darts and shaved an edge off the cuffs so they weren’t all pointy.  All in all it’s not bad, but I still feel vaguely like a basic soccer mum when I wear it, which isn’t how I want to feel.  In retrospect the recommended distance between the buttons is too far, the collar shape’s still a bit off, curved side seams are stupid and the cuff slits shouldn’t be faced in a heavy fabric.  I’ve learned my lesson.

DSC_1094Not that you can really tell.  But I know.

DSC_1095

Business on top, party underneath.

Using a heavier fabric for the undercollar and outer collar stand was a good plan though, because screw interfacing.

The next experiment was conducted in leftovers from the zodiac dress (which btw I never wear).  I added a 4cm box pleat to the back for added squareness, shaved a bit of the pointiness off the collar, and put the buttons closer together.  I didn’t have enough fabric for full sleeves, so I did half sleeves, rejoicing at how it also meant that I didn’t have to wrangle cuff slits again.

DSC_1092

The angle of the collar is slightly wider and less ’70s.

DSC_1090

Shell buttons are what I had.  Forgive the wrinkles, I wore it yesterday.

DSC_1089

Trust me the sleeves look slim-cut on.

I couldn’t be bothered putting it on to take a photo, it’s freezing here.

Emboldened, I have embarked upon the foolish venture of cosplay once again.  Not 18th Century this time though.  because when do I ever do the same thing twice? I had to go to the completely opposite end of the spectrum:

satsuki

The only character with resting bitch face better than mine and eyebrows better than Cara Delevigne, Satsuki Kiryuin from the decadently OTT anime Kill la Kill.  I really love the design of Junketsu, her uniform.  It’s got a great balance of elements and influences, and just enough patterning challenges without requiring too much engineering or working with awful stretch fabrics (which as I have mentioned before are the spawn of Bealzebub).  Because it’s got a very stiff military aesthetic, I got a mid weight cotton twill, which has got a similar hand to the fabric used in naval dress uniforms, even though it’s a little thicker.  I didn’t want to fiddle around too much with lining, so it had to be thick enough that it’s opaque.

Pattern wise I started off with a plain ol’ princess bodice and worked from there.  Behold my illegible plan:

DSC_1096

Most of the vertical seams will be hidden by the gold detailing, which is important because this fabric shows its seams no matter how crisp it’s pressed.  Bearing this in mind, I wanted to keep that really smooth effect at the front where it appears as though there isn’t a waist seam and the pleats flow directly out of the front panel.  Solution: godets.  Only, I pressed mine into pleats.

DSC_1076

I think we should call them pizza-pleats.

The little square pieces added at the sides are because I overestimated my bodice length.  Of course I didn’t test it with a toile, this is seat-of-the-pants stuff as usual.  Then I added on the side and back panels.  (The skirt side panels will be pleated and pieced in separately, so yeah they’ll have a waist seam. Shh.)    Fitting it, I’ve realised that I need to take it in a bit under the arms and cut the armscyes out more at the back because I have what Natalie Bray refers to in Dress Pattern Designing as ‘especially erect posture’, as well as square, prominent shoulders. The sleeves will be from my shirt pattern, because they work and have enough ease for the elbow-crinkle she’s got going on, and the collar will be a separate piece and I’ll snap it on or something.  This is the stage it’s at now:

DSC_1083

Excuse the pyjamas.

Should have mentioned as well, an extra bra with some socks in it is lending me some aid.  Satsuki-sama (like the rest of woman-kind, let’s face it) is a couple of sizes up from me.

DSC_1084

I think I keep up in the resting bitch face department though.

Dang, you can see the wrinkles that my posture causes though.  Should have twigged ages ago when the pattern book said its recommended armscye shaping was for the ‘slightly rounded posture of today’ (by which they mean, like, the ’60s).  My back’s more like a board.

Next step, skirt side-panel wrangling, sleeves, collars and cuffs.  And then I can get to do the detailing, order an enormous wig and a fake katana, and work out how the hell I’m going to do those boots.  Other cosplayers before me have used stretch PVC over a boot or shoe, and held the resulting boot-stocking/leg-glove up with Hollywood tape.  The thought of my cantankerous Janome encountering stretch PVC makes me shudder.  It’s bound to be exciting.